|Administrateur|Administratrice")
To compensate for the obvious lack of 64-bit plugins, I improved the functions of PhotoFiltre 11 which allow exchange with external programs. It is now possible to communicate with other 64-bit stand-alone programs, transparently for the user. Once installed, they can be used as a filter on the current image and are available in the menu [Filter > Plug-in].
For the moment, it is possible to have up to 7 plugins of this type but they must respect a few rules:
- support the PNG image format in input and output (exchange format with PhotoFiltre)
- exit automatically once the image has been modified and saved under the same name
- the plugin configuration file must be named "MyPlugin<N>.ini" with N between 1 and 7
G'MIC plugin (GREYC's Magic for Image Computing)
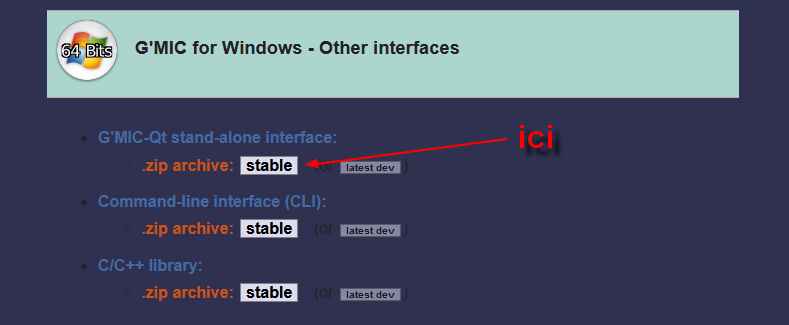
1) Download the latest 64-bit stand-alone version for Windows from the official website (choose the 64-bit Qt version carefully)
https://gmic.eu/
Screenshot : https://i.goopics.net/y1q3n7.png
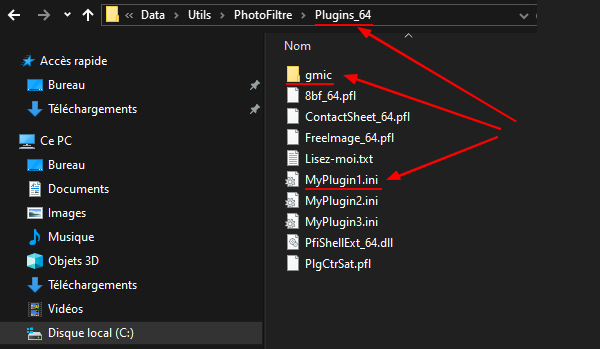
2) Unzip the archive wherever you want on your PC. In this example I decided to place it directly in the [Plugins_64] folder of PhotoFiltre 11. I also chose to have a constant folder name to simplify in the event of an update, so I renamed it [gmic] quite simply.
3) Copy the "MyPlugin1.ini" file to the [Plugins_64] folder. You can download it here :
https://photofiltre-studio.com/pf11/sample_ini_gmic.zip
Screenshot : https://i.goopics.net/hli6rk.png
If you open it, you see that it is very simple, you just need to update the "ExeFilname" line but this is not necessary if you have correctly placed and renamed G'MIC as indicated above
4) Launch Photofiltre 11 and you should have the new plugin in the menus [? > About plug-in] and [Filter > Plug-in]
Viveza 64-bit plugin (Nik Collection)
In this example I assume that you already have it on your PC. In this case, simply create a new ini file that we will name "MyPlugin2.ini" or a name that is not used (always in the [Plugins_64] folder). It is simpler because there are only default values. In my case it is installed in the [Downloads] folder but you must adapt the "ExeFilename" line according to your installation.
Code : Tout sélectionner
; Configuration file for Viveza 64-bit (stand-alone)
; --------------------------------------------------

[PHOTOFILTRE_LINK]
ExeFilename=%USERPROFILE%\Downloads\Viveza 2 (64-Bit)\Viveza 2.exe
Caption=Viveza
About=A Nik Collection plugin.External plugins that use command-line converters (CLI) can open and save images in formats not natively supported by PhotoFiltre. This method allows the user to be independent of PhotoFiltre 11 updates and thus modify and add new formats themselves. They are integrated into the PhotoFiltre environment and are accessible via the standard open and save commands.
Converter plugins: https://photofiltre-studio.com//pf11/pl ... amples.zip (10.7 MB)
Screenshot of what you should get: https://i.goopics.net/w1wdhx.png
1) Installing the command-line converters
In the archive, I provide three converters. You can of course add others, delete them, or adapt them according to your needs.
1) magick: portable/static/64-bit/8-bit per pixel version (imagemagick.org)
2) simple_dcraw: LibRaw-0.21.4-Win64 (libraw.org)
3) pdftopng: xpdf-tools-win-4.05 (xpdfreader.com)
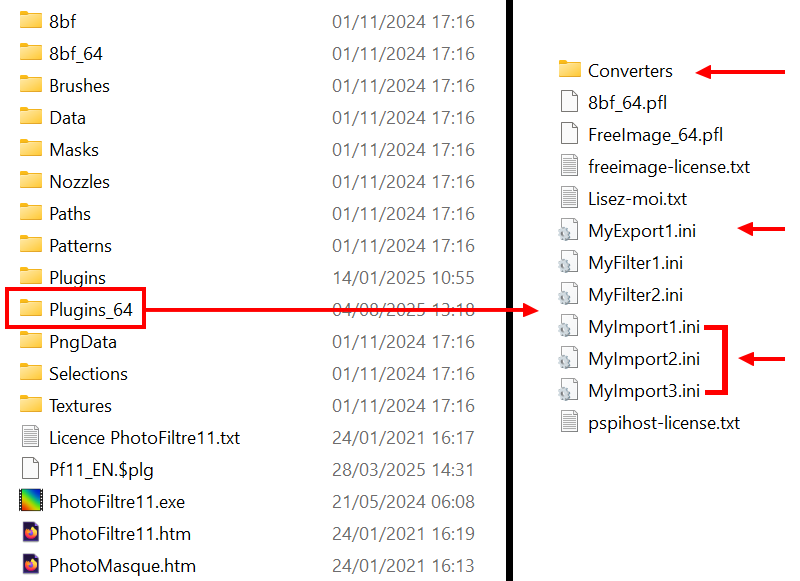
Copy the [Converters] folder into the [Plugins_64] folder of PhotoFiltre11. Once copied, you must verify that the files are running correctly (this should only be done once after installation). To do this, double-click on the three executables located in the [Converters] folder:
- Enable the Windows SmartScreen/Antivirus unlocker, which is linked to each new installation.
- Check that there are no error messages due to a missing DLL. Visual C++ Redistributable 2015/2022 is normally already installed for other uses.
If everything is OK, you should see a DOS terminal window open and close immediately.
2) Installing the Plugin Configuration Files
Now we can copy the plugin configuration files to the [Plugins_64] folder (these four files are included in the archive). Here's a quick description:
- MyImport1.ini: Allows you to open AVIF / HEIF / HEIC /JXL formats (you can add more if needed)
- MyImport2.ini: Opens images contained in CR3 RAW files
- MyImport3.ini: Allows you to convert the first page of a PDF document to a PNG image
- MyExport1.ini: Allows you to save in AVIF / HEIF / HEIC formats
If you were able to get these converters to work by double-clicking, you can launch PhotoFiltre. If everything is correct, go to the [? > About Module] menu and you should see the corresponding new menus. Now you just have to open and save an image as usual via the menus and dialogs.
|Nouveau|Nouvelle")